A bit about sheet mulching…I am about as addicted to it as you can be, for something you don’t do all the time. I wait patiently for the materials, but as soon as they end up at our house, I am already thinking about the good soil they will one day turn into. I love to sheet mulch, and watch things grow.
I used to order food in bulk monthly from Neshaminy Valley Natural Foods in Pennsylvania. Whenever we ordered, the deliveries arrived in small boxes. This was SO great…NO annoying plastic bags! Items we could use! And re-use!
The beauty of cardboard boxes
If anyone was moving, we’d always have boxes to give them. If we needed to ship any items, we’d have the correct containers for sure. Generally, we’d stockpile until we had enough other “ingredients” to perform the aforementioned sheet mulching. (This style of mulching is also called “lasagna” style gardening).
Mulch it!
To sheet mulch yourself you will need :
Cardboard boxes
Newspaper, preferably printed with soy ink
Compost finished or unfinished
Topsoil, if you have no unfinished compost
Grass clippings or straw
seeds or plants
An area that is generally barren, just mowed, or recently cleared by chickens, pigs, goats, or the like are ideal places to locate your first sheet mulch bed.
Of course, if this is one of your first efforts at gardening, you may want to build the sheet mulch bed closer to where you live so you can keep a close eye on it. This will help you to keep up with weeding, watering, etc.
A growing recommendation
The good thing about sheet mulching is that it reduces the need for both watering and weeding. Still, there’s a saying: “the best fertilizer is a gardener’s footsteps”. You will harvest much more of your garden if it’s just feet from your back door, or closer.
Wait until after a good rain or soak the area well with water where you will build the bed. Water with hose on “shower” setting for several minutes to simulate a good rain shower.
You can add crushed eggshells, calcium or urine (diluted 1:10) to increase calcium and nitrogen content of the bed. It will eventually all penetrate and transform surrounding soil.
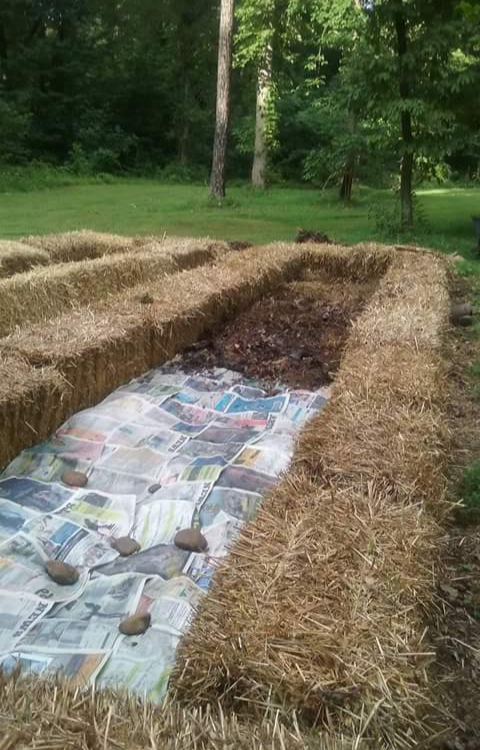
Lay down cardboard one layer thick. Make sure you are overlapping the edges so weeds will not have an easy chance to grow through.
Soak the cardboard again with the hose. This ensures you’ll have a moist bed for several days. You also will be able to leave it alone for a while without worrying about the contents getting blown away.
A word about wind
Sheet mulch beds can get messy quickly if allowed to dry out. If it’s in their first few weeks of establishment, and it’s March or really windy, you could end up with a mess. You’ve been warned!
Lay down finished or unfinished compost; if you have neither, put down manure. Rabbit or slightly aged cow manure is good. These are less “hot” with excess nitrogen, so they won’t burn your plants when they grow into the new soil.
Unfinished business
Unfinished compost can be anything from kitchen scraps to loamy brown finished garden soil…all of these are fine.
The fact has been argued that UNFINISHED compost is better for several applications. This is because it will give up energy it would’ve released into a pile, instead of into a bed full of plants, helping them along instead. Experiment, if it moves you.
A little good news…
On top of these two layers, place newspaper3-5 layers thick, once again, with overlapping edges, and soak, to keep the paper from drying out and blowing away now or later.
The last layer is just what you’d commonly call mulch: cover the entire bed with straw grass clippings or even finely shredded wood chips. This will keep the bed moist, prevent evaporation, and protect the soil from eroding, or from blowing away. (Yes, this happened to me!)
If you live in an arid area, you may want to keep the bed a safe distance from the house and use less flammable types of mulch. Wood mulch is usuallly better than straw. Make a small clearing in these areas and plant the seeds or plants that you have chosen.
Water well, once more and make sure it is not pooling water. It should be moist to the touch, like a cake, not pudding.
Now you’ve mulched, watch it grow!
Your seeds should sprout easily here, and the only maintenance needed till harvest is occasional watering, and re-mulching to cover up the edges of the cardboard or newspaper. Most of the cardboard or compost will break down into more soil. You will find more worms within one to six months.
When to sheetmulch
The best times to build sheet mulch beds are in preparation for next year’s crops in the Fall, or in the early Spring. These times are when you find you have excess seeds and plants and need more beds.
Really, though, any time you have space and materials for another sheet mulch bed is a good time to build one. It’s an excellent way to heal the earth, as it supposedly takes five hundred years’ worth of normal processes to build just one inch of soil. (Yep, you read that right).
Repurpose and upcycle and watch your garden grow
While you clear out your closets, consider reusing items that otherwise might get thrown away or need to be carted off to the recycling centers. What’s good for the earth is good for the soul. You can create a beautiful space with just a few medium-sized boxes on a 4×4′ piece of ground.
Start a bed of zinnias for cutting if you are renting. Or, consider growing salad greens. If you plan on being there a while, plant a row of peas, a row or two of onions, and a few strawberries for a compact but small spring garden.
Share the process, share the fun!
And don’t forget to invite at least one other person to hose you and the bed down when you sheet mulch; it makes the process sloppy, alchemical, and fun!